Installation and Configuration
Mounting
The Micro Edge is 115mm x 65mm. It is designed to be mounted on flat surfaces using external screws.
The Micro Edge can be mounted in any orientation.
The sensor should always be mounted in a location such that it will not experience very high or low temperatures.
When selecting a mounting location, position relative to the LoRa gateway should be considered.
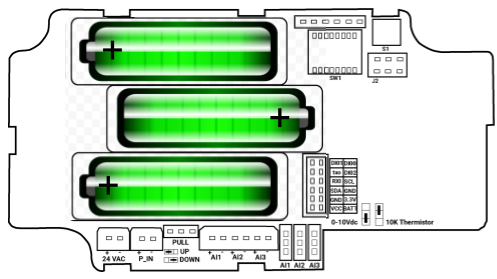
Power
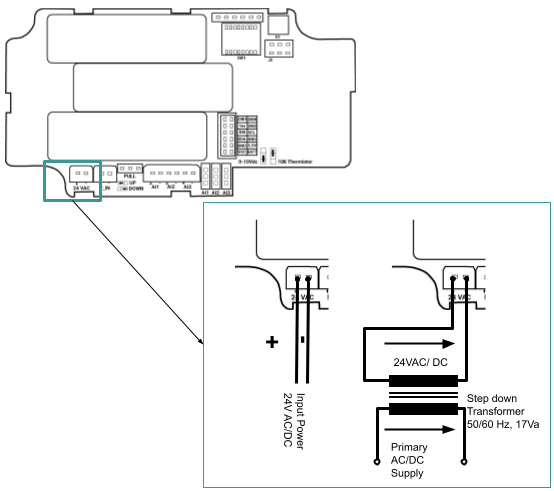
The Micro Edge sensor can alternatively be powered by a 24 VAC power supply by wiring into the 24 VAC + and - terminals.
Power wiring shown below.
Sensor Positioning and LoRa Signal Quality
Micro Edge sensors utilize LoRa IOT Wireless radio technology.
This wireless system features long range, and good object penetration.
However, care still must be taken to position sensors such that they have a good communication signal with the LoRa Gateway.
The quality of the communication signal depends on the distance from the LoRa Gateway, and the objects between the Micro Eddge sensor and the LoRa Gateway.
Onboard Reset/Push Button
Nube iO Micro Edge sensor has a small Reset Button within the sensor.
This Reset Button is used to trigger a data push for testing purposes.
This function is frequently used when deploying and testing MicroEdge sensors.
The Reset Button is also used in some configuration steps.
The Reset / Push Button location is shown below.

Onboard DIP Switch Configuration
Micro Edge sensors have a bank of 8 x small DIP switches within the sensor.
These DIP switches are used to configure the functionality of the sensor.
These DIP switches are located near the batteries on the sensor PCB.
Open the sensor cover to find the DIP switches within.
- DIP switches are ON/1 when pushed UP, and they are OFF/0 when they are pushed down.
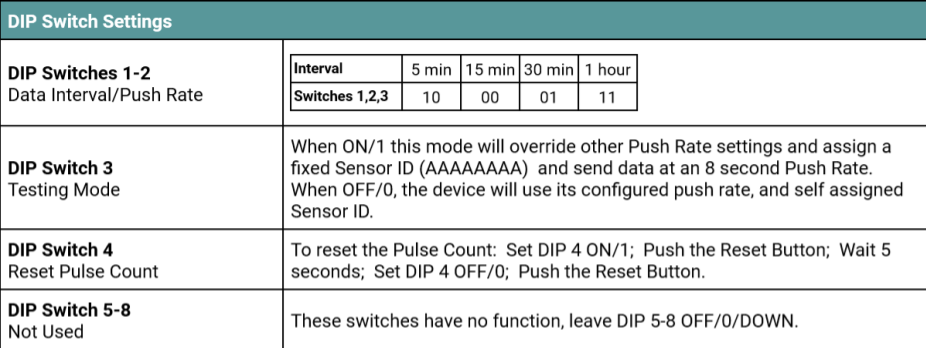
- DIP switches 5-8 have no function, they should remain in the OFF/0/DOWN position.
Push Rate
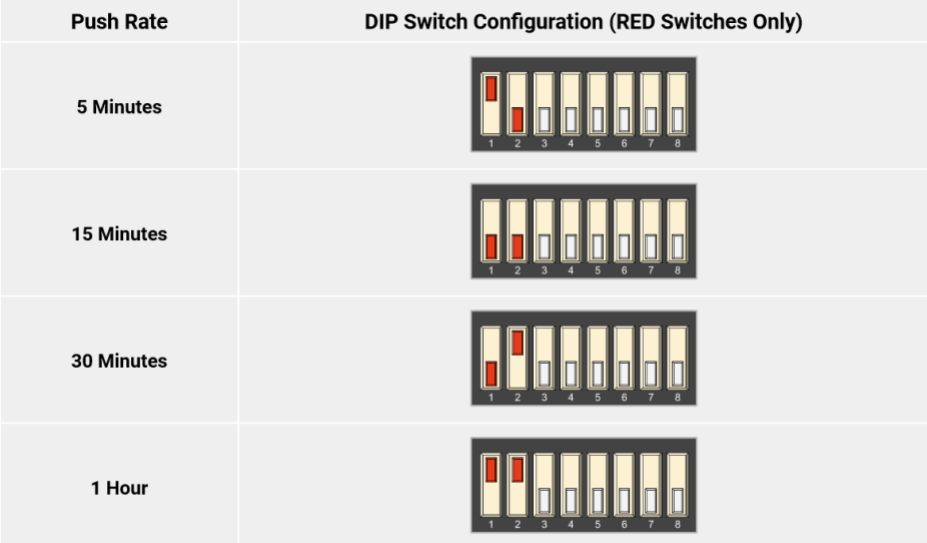
DIP switches 1 and 2 are used to set the push rate of the MicroEdge sensor.
The sensor will send the sensor data at the configured period as configured by these first 2 DIP switches.
Testing Mode
DIP switch 3 is used to set the MicroEdge sensor in Testing Mode.
In Testing Mode the MicroEdge will temporarily self-assign a known Sensor ID and send a Data Push every 8 seconds.
Testing Mode is enabled when DIP switch 3 is ON/1/UP.
Testing Mode aids in identifying and positioning the MicroEdge sensor.

Reset Pulse Count
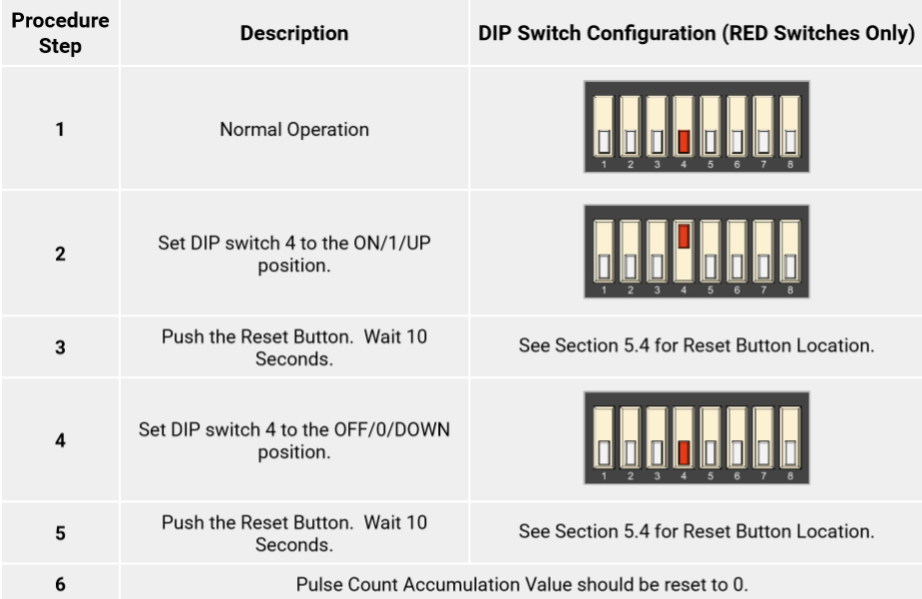
DIP switch 4 will reset the Pulse Count Accumulation value to 0.
Follow the below instructions to reset the Pulse Count Accumulation:
DIP Switch Configuration Table
Onboard Jumper Configuration
Micro Edge sensors have 4 sets of small jumper pins within the sensor.
These jumper pins are bridged to configure the functionality of the sensor inputs.
These sets of jumper pins are located near the batteries on the sensor PCB.
Remove the sensor cover to find the jumper pins within.
Jumper pins are bridged using a small plastic jumper bridge, there should be 1 jumper bridge per set of 3 jumper pins.
Jumper bridges are connected between the center pin and one of the outside pins of each set of jumper pins.

AI / UI Type Select Jumpers
There are 3 sets of AI/UI Type Select Jumper Pins, 1 set for each AI/UI.
There are 2 valid configurations for each jumper pin set.
Jumper positions are shown on the diagram below. AI1, and AI2 are set with the jumper bridge installed in the position for Digital OR 10k thermistor.
AI 3 is set with the jumper bridge installed in the position for 0-10VDC.
There is a legend for these jumper settings on the PCB.
-31721b5ae3fd87f24e614eba8e45dea1.png)
Pulse Type Select Jumpers
There is 1 set of Pulse Type Select Jumper Pins. There are 2 valid configurations for this jumper pin set.
Jumper positions are shown on the diagram below. The jumper pin set labeled PULL is used to set the input type of the Pulse input.
In the diagram below, the PULL jumper bridge is set to the UP position.
Please reference the below table for the input types that correspond to each jumper bridge position.


Physical Input Wiring
This section describes how to connect/wire physical inputs to the MicroEdge sensor.
There are Input Type Select Jumpers that must be installed to select the correct type of input; see the Onboard Jumper Configuration section above for Jumper Position Settings.
AI / UI Input Wiring
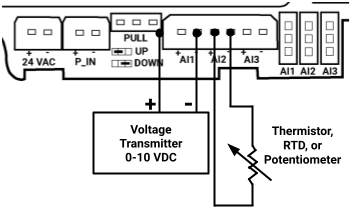
Wired Inputs consist of wired sensors or wired signals from other devices. They are wired to the Universal Input (AI/UI) terminals. Wired Inputs are grouped into 2 main groups: Digital - Only 2 possible states: either an open circuit or a closed circuit. Includes: simple switches/buttons, relays, and other types of dry contact (ex. status signals from other devices). Analog - Many possible states based on Voltage, Resistance, or Current. Includes: Temperature, Humidity, Pressure, CO2, Position Feedback, etc…
Digital Inputs
Digital Inputs are connected between the Ground(GND) terminal and the selected UI terminal.
There is no polarity for Digital Input wiring (ie. input wires can be swapped).

Analog Inputs
Analog Inputs are connected between the Ground (GND) terminal and the selected AI/UI terminal.
There is usually a correct polarity for Analog Inputs (ie. correct wire must be on the correct UI terminal).
There are 2 main types of Analog Inputs:
- Resistance - Input is based on resistance. The most commonly used resistance input is Thermistor temperature sensors where resistance varies with change in temperature. There is no polarity for Resistance inputs (ie. input wires can be swapped).
- 0-10vdc - Input is based on DC voltage signal over the range of 0v to 10v. This voltage range is related to a defined range on the device that produces the 0-10v signal.
Pulse Input Wiring
Pulse Inputs consist of wired pulse signals from other devices.
They are wired to the Pulse Input (P_IN) terminals.
There are 3 supported types of pulse inputs:
- Dry Contact / Switch - Open/Closed circuit (no voltage). Wire as shown below.
- Signal Low: 3.3v signal goes to 0v when pulsed. Signal wire should be connected to the P_IN + terminal.
- Signal High: Signal goes to 3.3v when pulsed. Signal wire should be connected to the P_IN + terminal.
